
I've scoured (What am I? A pirate?) the internet for holiday gifts and decor ideas. I think I am going to try out a few and share with you what worked what didn't, but that's for another post. Right now I'm just going to share a tutorial that I came up with last February. It's a tutorial on how to upcycle a t-shirt into a tote bag. It's a great last minute/easy gift to make. OH, and it's Earth friendly.
Note: This is the first tutorial I've ever made and I think it was successfully explained clearly. Any questions, please ask! Also, this was done at my last house, so there is some awesome green bedroomness going on and old hairdonessisty.Just sew you know!
How To Make A Tote Bag Out Of A T-shirt
Okay, so when I made this is a tutorial it was specifically for Mrs. Koko Louise, but anyone can use this information to upcycle a tee into a cute tote bag. Use an old favourite tee that doesn’t fit you or if you’re a musician tryin’ to get rid of some of tees that just didn’t sell. *cough* Koko *cough* shoot, go to a second hand shop to find some goofy shirts to turn into gifts for your gal (or guy) pals (that is, if you don’t have any that you want to spare.)
For making a tote, I recommend that you use a shirt on the small/medium side. I suppose you can use a large shirt - you would have to make some measuring adjustments and cut off extra fabric (which may become garbage if you can’t figure out what to do with it.)
So anywho, I’m using an unsellable band tee that is a size youth medium.

I guess it makes me a freak that I can fit in a kids’ shirt, huh? I am making this tee tote into a 14”x14” square. You don’t have to make it this size, do what works best for what you’re using - I just suggest you make it even.
Supplies:
T-shirt (recommended sizes: women’s small/medium - unisex small - youth sizes)
rotary knife or scissors
workspace (plenty would be handy)
ruler
straight pins
matching thread (or contrasting thread - it’s your tote!)
Sewing machine or sewing needles
chalk or fabric pen (disappearing/mark be gone)
hands + eyes
the will to start and finish this project
Estimated amount of project time:
It took me 2 days, but that’s only because I only had time to do this between all of my classes. If I had a free day, I’d say this project only takes 1 hour - 2 hours max. (depending on your skill with sewing.)
Heads up:
Assuming the shirt you decide to use might have some stretch. Test it out before you do all the slicin’ and dicin’. If it has bit of a stretch or a lot, just keep that in mind when you sew by machine or hand. Do not pull hard - it will make the tote out of shape. Please take your time.
Step uno: measuring and marking
Lay your tee flat with the design side up/right side up. Get out your handy dandy ruler and marking materials. Since the t-shirt I’m using is black, (I am lacking in the chalk department and my marking pen is blue/purple, which is hard to see on black) so I am using straight pins to mark where I’m going to cut. To start measuring, I put my ruler at the bottom of the shirt collar, measure down to 14.75” - 1/4" seam for bottom of tote and 1/2" seam for top of tote, and mark/pin.
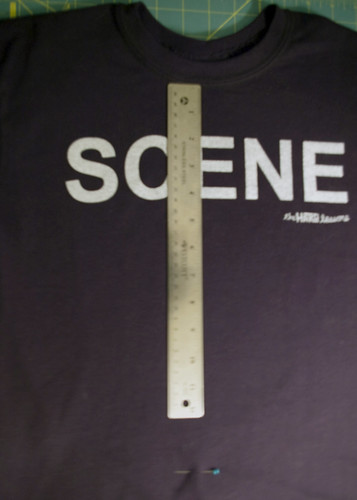
Now centering the design I measured the width of my design, which is 10”, and centered it on the ruler. I mark 2.25” to the left and the right of the design - which will make it 14.5” wide

You can make your measurements larger than what I am using, just use what works for you, but remember that you have to cut off the sleeves, and you should have some left over fabric to be used to make the straps.
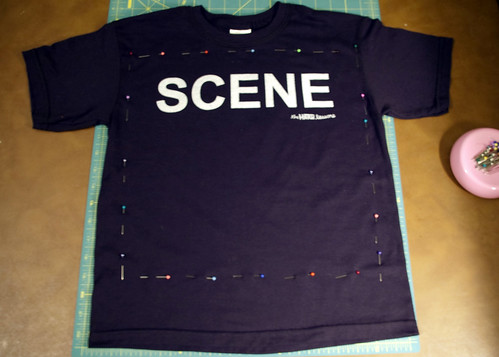
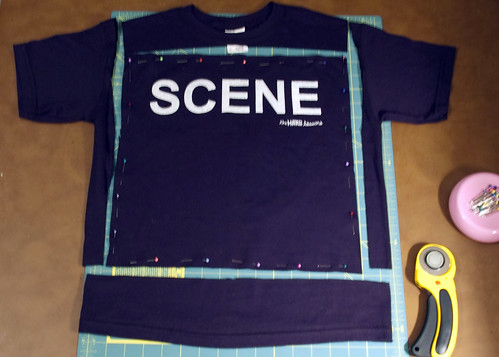
Step duex: cutting the shirt to size
Using your rotary knife or scissors, cut off the sleeves and the extra material at the bottom of the tee. Remember, we are going to use the extra fabric. You can use the sleeves to make pockets for the tote, a coin purse, or you can just toss them. Before you cut the fabric, it might be a good idea to throw in a couple pins to secure the fabric from moving around as you slice and dice it.
Step tree: preparing the tote straps
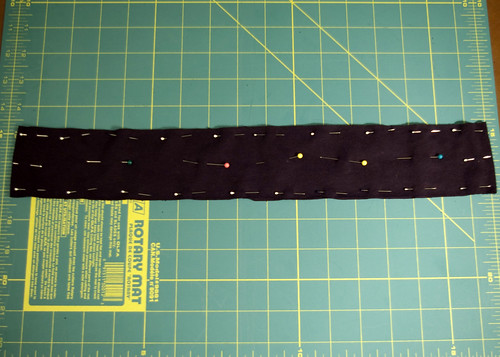
Remember that extra fabric that you cut off from the bottom of the tee? Now we’re going to use it. Yay! So, we want to make two straps correct? Si! Measure and mark/pin the fabric so then you can get two even straps. I had 2.5” of useable fabric, so I made my straps 1.25” wide. I like to double it to give the straps some extra strength.
Now it’s time to sew the straps! Simply sew the sides. I put the right sides together, sewed the sides, cut open one of the short ends, and then flipped it inside out. I don’t like to have the stitches showing, plus this might prevent some unraveling if some no-goodery were to take place and make your straps fall apart. Now you don’t have to flip your straps inside out, it makes the straps wider, but it may make them stretchier - depending on your shirt.
Step 4: tote construction
T-t-t-time to sew the tote together! Unpin the shirt and flip the pieces so then it is wrong sides out.
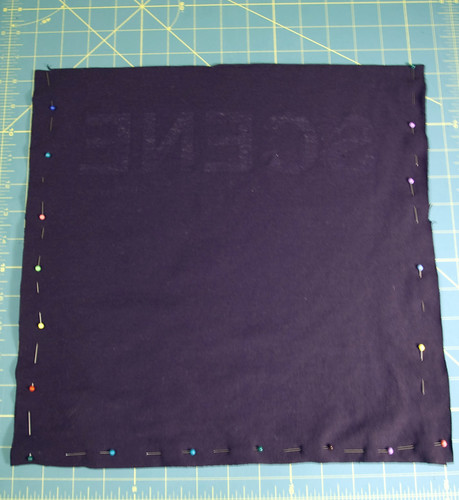
Time for sewing up the 1/4” seams! I did a running stitch, but you can do a zig zag stitch instead for security (if your tee is really stretchy). Now snip the bottom corners to insure that they will not look wonky when flipped right side out.
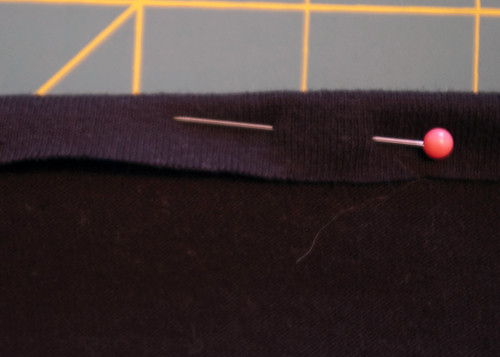
Now it’s time to make the top of the tote to look a little nicer. Fold the fabric about 1/2” down and pin it across on both sides of the tote.
Seams like a good idea to sew the straps on now (seams, get it?!) Anywho, I want to hide the end of the straps on my tote, so I am going to pin them on the wrong side. But before you pin your straps, draw a rectangle (about 1.5” tall) and an ‘x’ inside it with your chalk or fabric pen guy thing. This is how we’re going to sew on the strap to the bag. Since the tote I made is black, I have to wing it/guess. It’s black on black, so I tried highlighting it a bit to show you what I mean by ‘x’ in a rectangle.
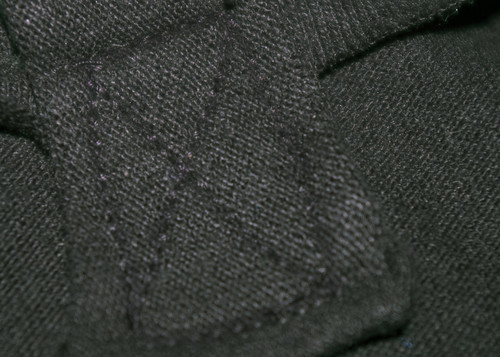
So, I am pinning the straps 3” from the sides of the totes. I like a good amount of strap to sit on my shoulder and not have them slide off, but feel free to do different. You can make them long or short straps. Also, you want the end of the strap to be 1” or 1.5” below the top of the bag.
Now sew! Sew like you’ve never before!
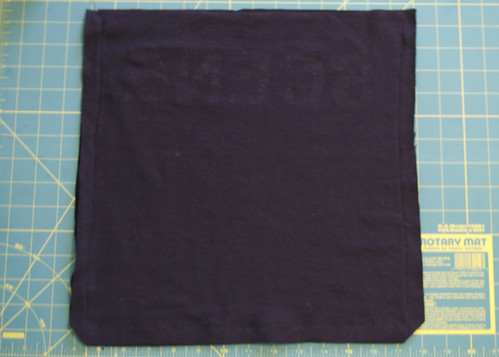
Once you have it done, flip your tote inside out! Ta daaaa! You have just upcycled a t-shirt into a cute and handy tote bag! Use it as a purse, for school,as a lunch bag, travel bag, or grocery bag!

I hope you enjoyed this tutorial! Please share with me if you've made an upcycled tee totebag or if you know how to make other things out of t-shirts!
<3 J.Loo
No comments:
Post a Comment